Electronic vs. Traditional Deadweight Testers
A modern replacement for the traditional deadweight tester
This article describes how a conventional deadweight tester is used to calibrate hydraulic pressure gauges and presents some disadvantages of this approach. It presents the E-DWT-H Electronic Deadweight Tester as a more effective, modern alternative and describes its features and benefits.

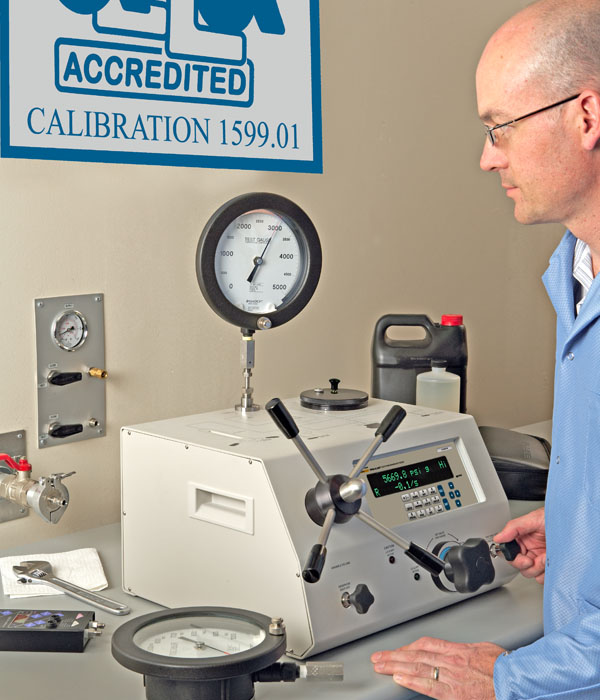
E-DWT-H’s fine adjustment valve enables the operator to set pressure to the exact nominal value on the gauge under test.
Application – calibrating a pressure gauge
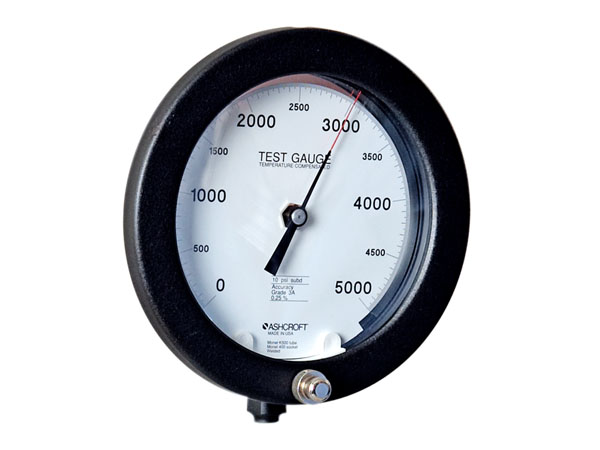
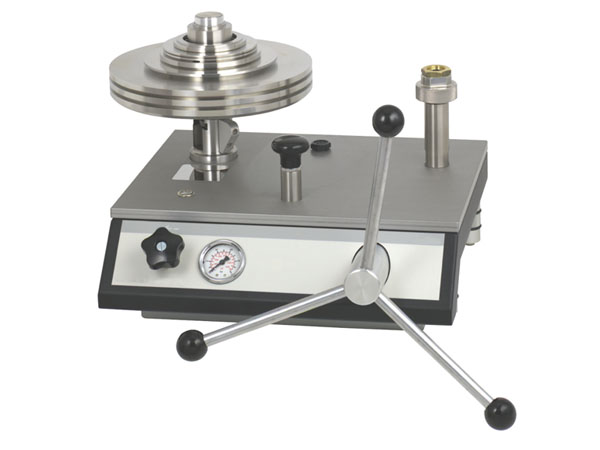
A common pressure calibration application is the calibration of high-pressure instruments, typically analog pressure gauges (see Figure 1). The definition of “high pressure” varies by organization, but typically it refers to instruments with a full-scale range over 1,000 psi (7 MPa). Because of the inherent danger of using a gas (very compressible, stores a lot of energy) and the expense/difficulty of generating it, high pressure calibrations are typically performed using a liquid as the test medium. This type of calibration is referred to as hydraulic. The two most common hydraulic media are oil and a water/ alcohol mixture. To calibrate an analog gauge, the calibration laboratory requires hardware to generate, control, and measure hydraulic pressure. The deadweight tester conveniently provides all three of these functions in one integrated instrument. (see Figure 2).

Figure 1. High-pressure instruments, such as the analog gauge pictured here, are often calibrated using hydraulic test media.

Figure 2. A conventional deadweight tester generates, controls, and measures hydraulic pressure.
A manual levered pump on the deadweight tester generates pressure by compressing the fluid in the reservoir. A small adjustable screw press allows the operator to adjust the pressure incrementally. The deadweight tester includes a piston-cylinder assembly configured so the piston can travel up and down within a column and is linked to a mechanism that carries manually loaded masses that apply downward force on the piston. The operator applies enough pressure in the system to “float the piston” inside the column. The applied pressure is proportional to how much mass is loaded. The gauge to be calibrated is mounted onto a port on the deadweight tester, placing the gauge in parallel with the piston and exposing it to the same pressure. When the system is “ready,” the operator makes the measurement by comparing the pressure defined by the deadweight tester to pressure measured by the gauge.
How a deadweight tester works and “measures” pressure
A deadweight tester does not actually measure pressure. Rather, it allows the operator to know or calculate the pressure when the system is in a specific state. This state, known as flotation, is achieved when there is enough force from the hydraulic pressure medium to support the piston in a floating state. The resulting pressure is proportional to how much force is applied by the mass loaded. The mass produces a force because it is accelerated by gravity—a force that varies by, and is resident to, the location. When the piston is floating, the pressure (P) is derived by calculating the force (F) applied by the total mass of the piston and additional applied mass divided by the area (A) of the piston: P = F/A. Because the pressure is proportional to the force, the operator measures higher pressure by loading additional mass and then re-establishing the floating equilibrium.
How to calibrate an analog pressure gauge using a deadweight tester
As mentioned previously, when calibrating an analog pressure gauge (or any other type of pressure instrument) using a deadweight tester, the operator connects the gauge in parallel with the piston and then applies the same pressure to both at the same time. The operator sets each test pressure in a previously defined sequence, one at a time. At each point, the operator records the analog gauge reading and the calculated pressure from the deadweight tester.
After recording the test data at each of the test points, the operator determines which, if any, readings are out of the specified tolerance. If the gauge requires adjustment, the operator follows registered procedures to bring the gauge back into tolerance over its span. The operator then typically runs a second test sequence to confirm that the adjustments were done correctly and that the gauge leaves the calibration lab within its acceptable tolerance. This repetitious process amplifies the time and cost required for calibrations when a slow or cumbersome method is used.
Unique requirement for calibration of an analog pressure gauge
As described above, at each point in the test sequence, the operator compares the pressure on the gauge to that defined by the deadweight tester. Normally the test sequence is several equally spaced test points over the span of the gauge. A typical test sequence may be from 20 to 100 percent of span test with test points every 20 percent. So, for a 10,000 psi (70 MPa) test gauge, the first test point is 2,000 psi (14 MPa). Normally the operator will load masses whose total force will result in a pressure of 2,000 psi (14 MPa) when the piston floats.
However, the analog gauge’s indicator needle usually will not be on the nominal point when the deadweight tester’s pressure is at the nominal value. In order to record a value for the analog gauge, the operator must interpolate, or visually estimate, the value between two lines. Since each operator may interpolate slightly differently, it is preferable to calibrate an analog pressure gauge by adjusting the test pressure at each point until the indicator needle is directly over the nominal pressure value. To do this using a deadweight tester, the operator must iteratively load very small masses (those corresponding to very low-pressure changes) and refloat the piston at each increment until the needle is at the nominal value.
The operator repeats this process at each test point throughout the range.
Tech tip: Predicting the pressure
The underlying premise for performing static pressure calibrations is our ability to predict the pressure at the device under test. There are many things that can hinder our ability to make this prediction based on the reference measurement. We must be sure that:
- leaks are eliminated, or at least reduced to the point of insignificance.
- all fluid heads have been identified and corrective action applied.
- there are no restrictions between the reference and the test.
- sufficient dwell time has been given to reach a new system equilibrium.
- the test medium is not contaminated with another fluid.
- the test device has been correctly zeroed if applicable to the calibration.
Disadvantages of using a deadweight tester
Although the deadweight tester is considered to be a primary standard, and for that reason is perceived to be a desirable solution for hydraulic calibrations, there are several inherent disadvantages to using it.
- Loading small incremental masses until the gauge reads the nominal test value is time consuming and not very efficient.
- The minimum pressure increment is limited by the minimum mass value in the mass set. If the test gauge is of high resolution, it may not be possible to position its needle directly on a nominal test point.
- The alternative to setting nominal pressures on the gauge under test by loading incremental masses is to interpolate the gauge’s reading, creating an opportunity for errors.
- Sometimes it appears that the test gauge is out of tolerance at a specified point when, in reality, the operator has loaded the incorrect mass.
- A deadweight tester system is not optimal for on-site calibrations. The tester and its accompanying masses are heavy and difficult to carry to the site of the gauge to be calibrated.
- For the same reason, it is inconvenient and expensive to ship the deadweight tester and masses to a calibration laboratory for annual recertification.
- Matching the piston area to the masses allows each mass to be conveniently equivalent to a whole number nominal pressure value for a given pressure unit. By configuring the mass set properly, the manufacturer can provide the customer with a set that can be loaded in a straightforward manner when the gauge is of that pressure unit. However, gauge faces are applied in a variety of different pressure units, which vary by industry, application, test system manufacturer, and so forth. To use the same deadweight tester to calibrate gauges with various pressure units, the operator either needs multiple mass sets or a conversion sheet that allow him to know the pressure by multiplying the original unit pressure by the conversion factor.
- Since the force on the system is calculated as the total mass times the acceleration due to gravity, the operator must know the gravity value at the location of use. If the deadweight tester is used in on-site applications, the user must learn the gravity at the various locations in order to make valid measurements. If the mass set is adjusted to nominal pressure values, it will no longer produce nominal values in an on-site location with a different gravity value.
- Since the deadweight tester is inherently a mechanical device, there is no convenient way to automate it. Once a test point is defined, the operator must write the data on a data sheet or manually enter it into a computer spreadsheet or application.
A better solution: The Electronic Deadweight Tester (E-DWT)
Despite its drawbacks, the traditional deadweight tester has been the stalwart high pressure, hydraulic calibration tool for many years. Its low uncertainty (accuracy) and comprehensive packaging provides all three required calibration functions (generation, control and measurement) into a single package. Until now, these features have been important enough to overcome its disadvantages, and the deadweight tester remained the preferred solution for hydraulic gauge calibrations.
More recently, manufacturers have launched transducer-based high-pressure hydraulic monitors that provide measurement performance sufficient for use as a reference calibration standard. A calibration lab could, in theory, acquire one of these monitors and either purchase a generation/control accessory or connect it to the generation/control portion of a deadweight tester. While feasible, such a solution requires two separate components plumbed and was not appealing enough to replace the conventional deadweight tester.
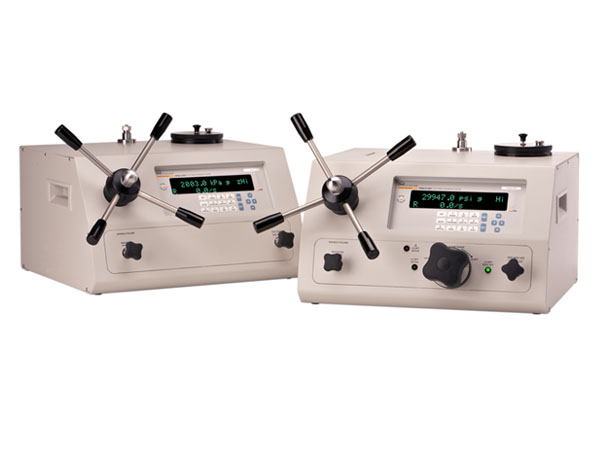
More recently, a new paradigm has been established with the introduction of the E-DWT, or electronic deadweight tester (see Figure 3). E-DWT-H (H indicates hydraulic platform) is a single piece solution for calibrating high-pressure hydraulic pressure gauges. The solution is called E-DWT because it is an electronic replacement for the deadweight tester. E-DWT-H includes a transducer-based hydraulic pressure reference. An oscillating quartz crystal sensor is built into a Fluke Calibration Quartz Reference Pressure Transducer (Q-RPT) module that, in turn, is installed into an RPM4 Pressure Monitor. The RPM4 is mounted in the E-DWT-H housing. The E-DWT-H housing also includes a reservoir for test fluid, a priming pump to force the hydraulic fluid through the test system, a variable volume screw press to generate and set the initial approximate test pressure, and a fine adjustment valve, which enables the operator to set the pressure to the exact nominal volume as indicated by the gauge under test.

Figure 3. E-DWT-H Electronic Deadweight Tester is a single piece solution for calibrating high-pressure hydraulic gauges.
E-DWT-H features
E-DWT-H includes numerous features that counter the shortcomings of a traditional deadweight tester and make it ideal for calibrating hydraulic test instruments.
- Pressure ranges up to 30,000 psi (200 MPa). The maximum pressures of traditional deadweight testers are typically 10,000 or 15,000 psi (70 MPa or 100 MPa). The E-DWT-H can therefore add capability that the calibration laboratory did not previously have.
- Variable volume screw press can generate the maximum test pressure with a single complete piston stroke thanks to the on-board priming pump. The operator avoids the cumbersome process of generating additional pressure by isolating the variable volume from the test system and drawing additional fluid from the reservoir. This process is common with other variable volume pressure generation accessories, when a single stroke is not enough to generate the maximum pressure. Also, E-DWT-H’s variable volume screw press is a high quality, low-torque device that makes precise adjustment easy at any pressure, and an option is available for larger volume test systems.
- User selectable pressure units make changing pressure units quick and easy.
- The fine pressure adjust valve enables the operator to easily set the test pressure precisely at the nominal gauge value. Once the nominal test pressure is stable, the operator simply reads the digital reference pressure from the E-DWT-H pressure display. This eliminates the time-consuming iterative process of adding more mass to define different test pressures until the nominal gauge pressure is established.
- The reference uncertainty of the Q-RPT module is ± 0.02 % of reading from 100 % down to 10 % of the reference transducer’s range. With a k=2 coverage factor, this specification is valid for an entire year. E-DWT-H can house a second Q-RPT module to extend the percent of reading uncertainty to an even lower pressure. With a second Q-RPT module whose range is 10 % of the high range Q-RPT, E-DWT-H offers uncertainty of ± 0.02 % of reading from 100 % down to 1 % of the maximum range. The Q-RPT ranges are user selectable. For example, if the user chose a 200 M (30,000 psi) and 20 M (3,000 psi) Q-RPT, this configuration would offer one year uncertainty of ± 0.02 % of reading from 30,000 psi (200 MPa) down to 300 psi (2 MPa) in a single instrument!
- E-DWT-H always displays the actual reference pressure. The operator no longer needs to worry about loading the correct masses and making calculations and comparisons.
- The E-DWT-H reference Q-RPTs are not fundamental; therefore, the operator does not need to know the local gravity to use it. E-DWT-H works the same way in the user’s calibration lab as it does at his customer’s location when used as an on-site calibration tool.
- E-DWT-H is lightweight (35 pounds, or 15 kilograms) and its metal enclosure is fabricated with recessed areas that function as convenient handles for lifting and carrying. This makes it ideal for on-site applications. An optional rugged, molded transit case with wheels is available.
- E-DWT-H is powered by standard building voltages. A rechargeable battery pack accessory allows it to be used for field applications where a power source is not available.
Unique benefits available due to electronic nature of E-DWT-H
In addition to the features described above, which highlight how E-DWT-H overcomes the limitations of the traditional deadweight tester, its electronic nature offers advanced features that the operator can exploit to further improve the efficiency and results of the test.
- E-DWT-H offers an objective ready light that tells the operator when to record the reference pressure. The indication is based on the stability of the measured pressure and can be set to a value determined by the lab manager. With this feature, all users will very likely obtain repeatable results.
- E-DWT-H embedded software includes an AutoTest function that enables the operator to define the test sequence and have E-DWT-H guide him point-by-point through the test. At each test point, E-DWT-H records the reference pressure and compares it to the nominal gauge pressure. It then compares the difference to the acceptable tolerance for the gauge under test and determines whether the measurement is within tolerance or not. This feature also helps ensure that test results are consistent among users. The results can be downloaded and viewed with a PC using a remote interface via E-DWT-H’s RS-232 communications port.
- A more advanced alternative for recording and evaluating the data is to run the test via PC-based calibration software. Using E-DWT-H’s RS-232 communication port, the user can run the test sequence from the PC software and record the test data and other relevant parameters electronically. With this data stored in a test file, the calibration software can then generate customized calibration reports. Fluke Calibration offers COMPASS® for Pressure calibration software to perform this function.
Summary
The traditional deadweight tester has been the primary instrument used to calibrate high pressure, hydraulic, analog pressure gauges. This trend continued despite some significant drawbacks because it offers low uncertainty and a single component for generation, control and measurement of the pressure.
Now a new solution is available called E-DWT-H (electronic deadweight tester) which offers not only the attractive features of the traditional deadweight tester but also characteristics that eliminate deadweight tester drawbacks and features that add significant utility.

